


How to Monitor and Control FPS in CS2
Frame rate is one of the most critical factors in determining your skill ceiling in games like Counter-Strike 2. Quick reactions and smooth gameplay can not only help you make improvements much faster but are also important simply for an enjoyable gaming experience. This guide provides a walkthrough on how to monitor and control FPS in CS2, providing multiple avenues to monitor and control your FPS based on your personal preference and a quick run-through for the best CS2 settings for FPS!

Check out this complete article on the "Best Settings for FPS in CS2"
How to Monitor FPS in CS2
Before making adjustments to optimize your system to pump out as many frames per second as possible, we first have to monitor it. CS2 provides several ways to do this in video settings/game settings, but you can also monitor it through third-party applications, which you can access through the Windows search bar.
Enable Developer Console
For some of the settings found below, the developer console is required. If you already have the developer console enabled, you can skip this part. If not, this is a quick guide:
-
1Free Coins
-
2Free Cases
-
3Promo Codes
Monitoring FPS through Game Settings
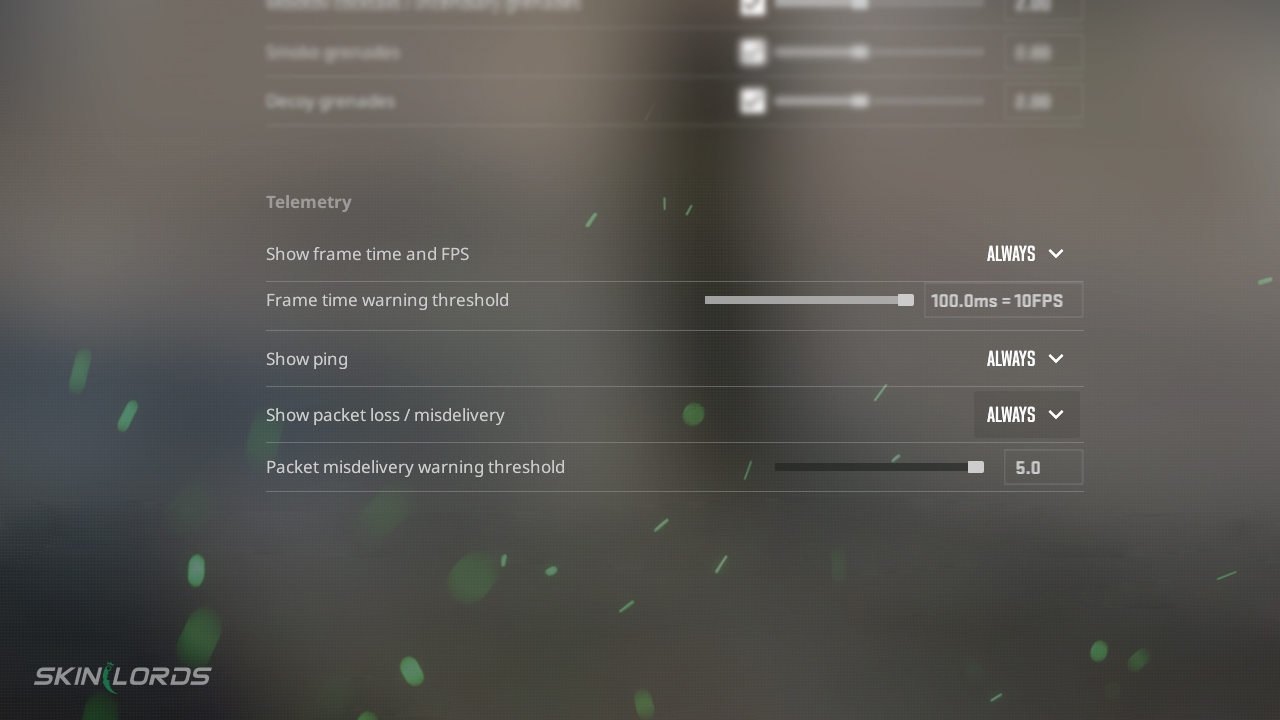
The easiest way to monitor your CS2 FPS is simply through the telemetry tab in the game settings. Telemetry is a collective of settings that allow you to display important network information, including your ping, FPS, and packet loss. To learn more about telemetry and the net graph, check out our in-depth guide titled “Net Graph and Telemetry in CS2 – How to Monitor FPS and Server Connection.” That will help you diagnose network problems you may encounter.
To enable telemetry, follow these three simple steps:
-
1Free Coins
-
2Free Cases
-
3Promo Codes
In telemetry, you can opt to display just the FPS counter or monitor other advanced video settings as well, which can help you during competitive play. Once again, to learn more about each text field/setting, we have a much more in-depth article breaking down each component titled “Net Graph and Telemetry in CS2 – How to Monitor FPS and Server Connection.” This article also includes how the console commands changed between Counter-Strike Global Offensive and Counter-Strike 2.
Using Third-Party Software
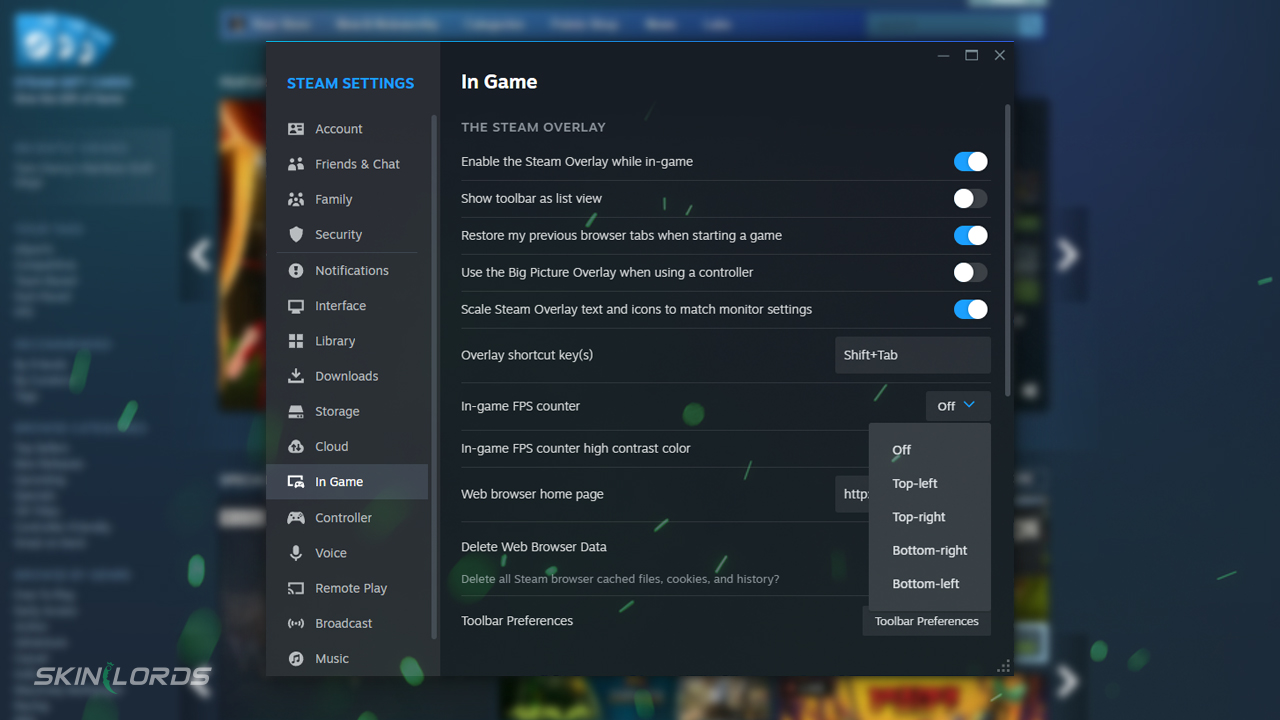
The second of the two methods to monitor FPS in CS2 is to use third-party applications, including MSI Afterburner, NVIDIA GeForce Experience, or the Xbox Game Bar, which should come preinstalled on devices running Windows 10/11. However, the easiest way is to monitor FPS through the Steam overlay. Here’s how to open the respective applications or enable Steam’s overlay.
- Steam Overlay – Open Steam > Open Steam Settings (Drop-down menu under “Steam” at the top left) > Open the “In Game” tab > Enable In-Game FPS Counter.
- Xbox Game Bar – Windows Key + G
- MSI Afterburner/NVIDIA GeForce/others – If these programs are downloaded, you can quickly locate them through the Windows search bar or head into your PC’s program files.
How to Control FPS in CS2
That’s enough options for monitoring FPS in CS2. Now, let’s dig into controlling FPS in CS2.
Set Your Monitor’s Refresh Rate
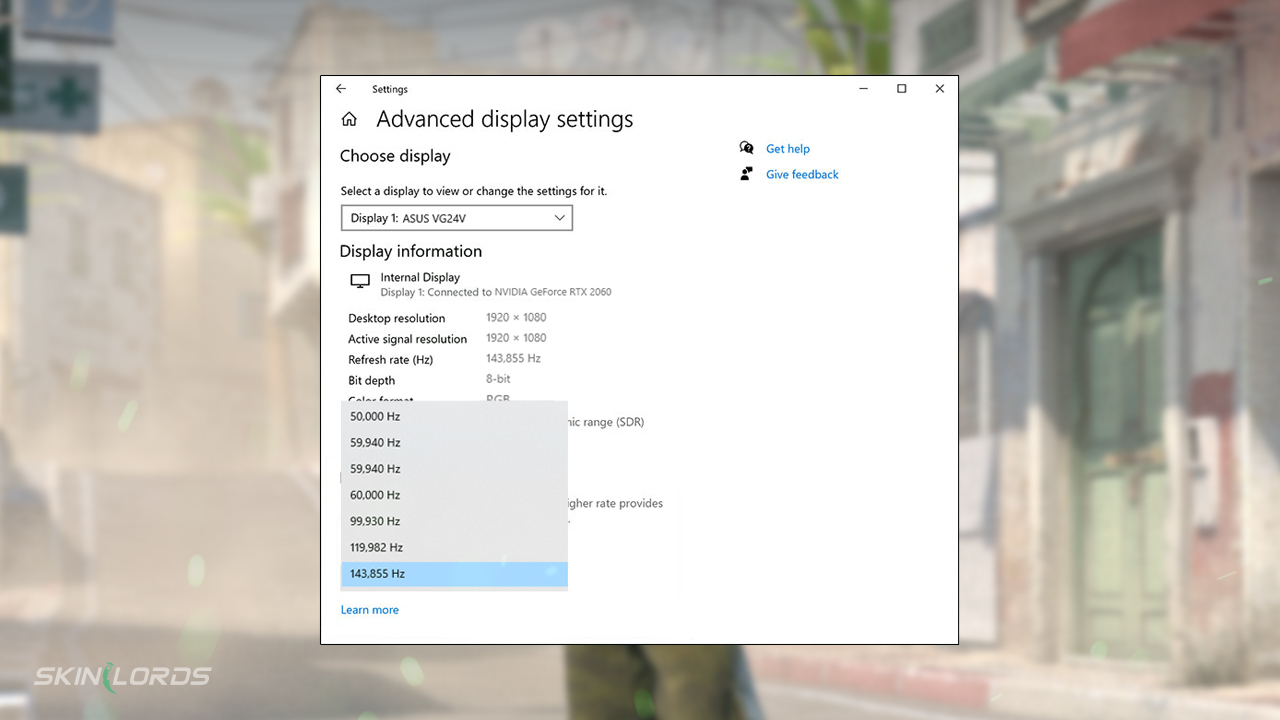
Before we do anything in CS2, let’s first go through the most common mistake in Windows settings – capping your monitor’s refresh rate. Follow these quick instructions to check your refresh rate: Open Windows Settings > Display > Advanced Display > Choose a Refresh Rate. From this drop-down menu, select the correct monitor and then select the maximum refresh rate.
Setting a Maximum FPS in CS2
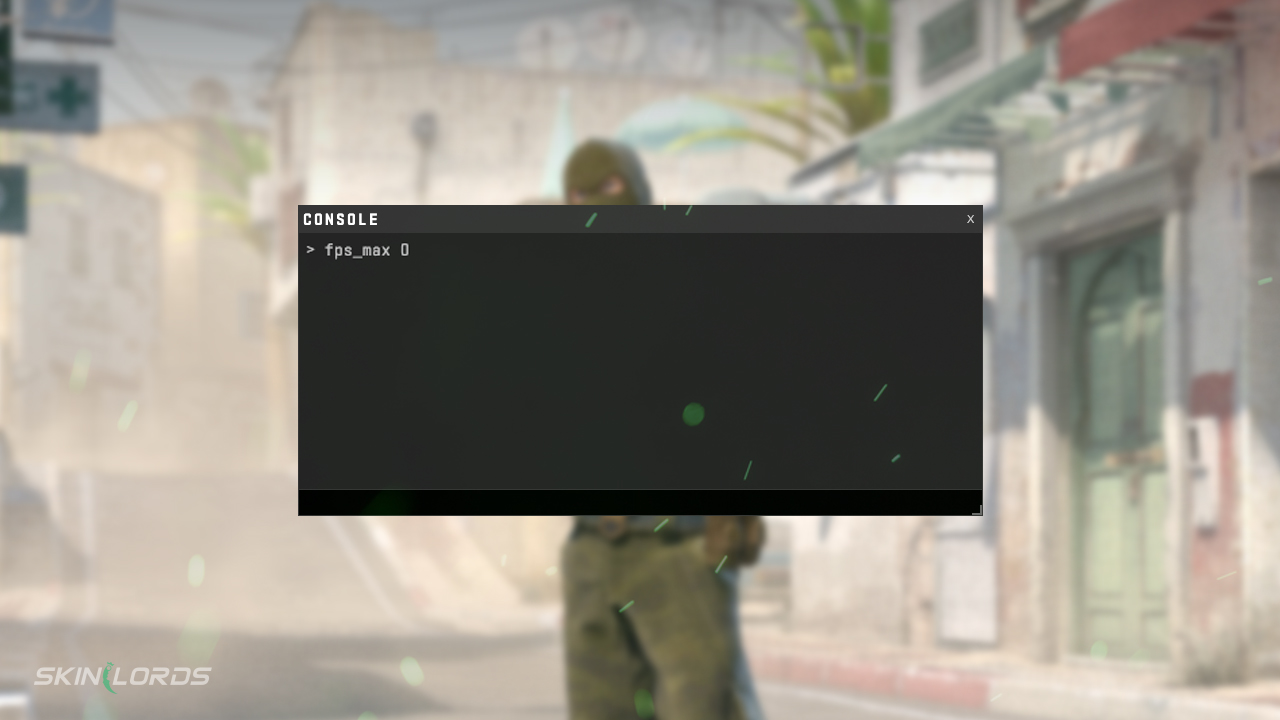
Opening the developer console (there’s a quick tutorial for this earlier in the article), you should enter the following command, replacing the ‘[#]’ with the maximum frames per second your monitor can output, then hit enter for the command to take effect.
fps_max [#]
This is the easiest way to control FPS in CS2 and ensure your PC isn’t working overtime, generating frames that aren’t displayed.
Best CS2 Game Settings for FPS
We have a much more in-depth guide titled “CS2 FPS Guide – The Best Settings for FPS in CS2,” which describes how to increase PC performance to maximize FPS in CS2. Here’s a quick summary of that. These settings are mainly for PCs with low fps, meaning they will sacrifice graphics for performance.
Video Settings

- Resolution – DThe defaultresolution is 1920×1080. Common resolutions that can improve performance are 1280×720 or 1024×768.
- Aspect Ratio – Many prefer 4:3, which can improve FPS.
- Display Mode – Fullscreen can increase FPS by dedicating all system resources to CS.
- Laptop Power Savings: Disabled – Disabling this ensures maximum performance, mainly for players using laptops.
- Refresh Rate – Default for your monitor.
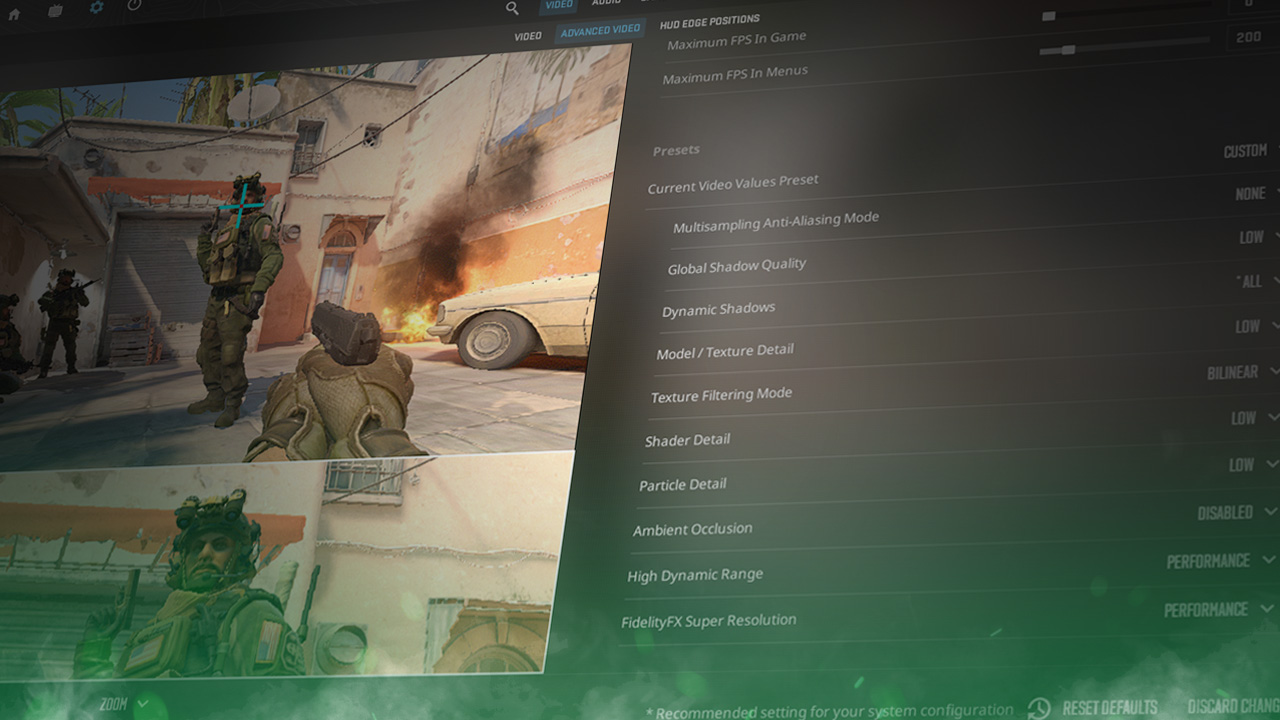
Advanced Video Settings
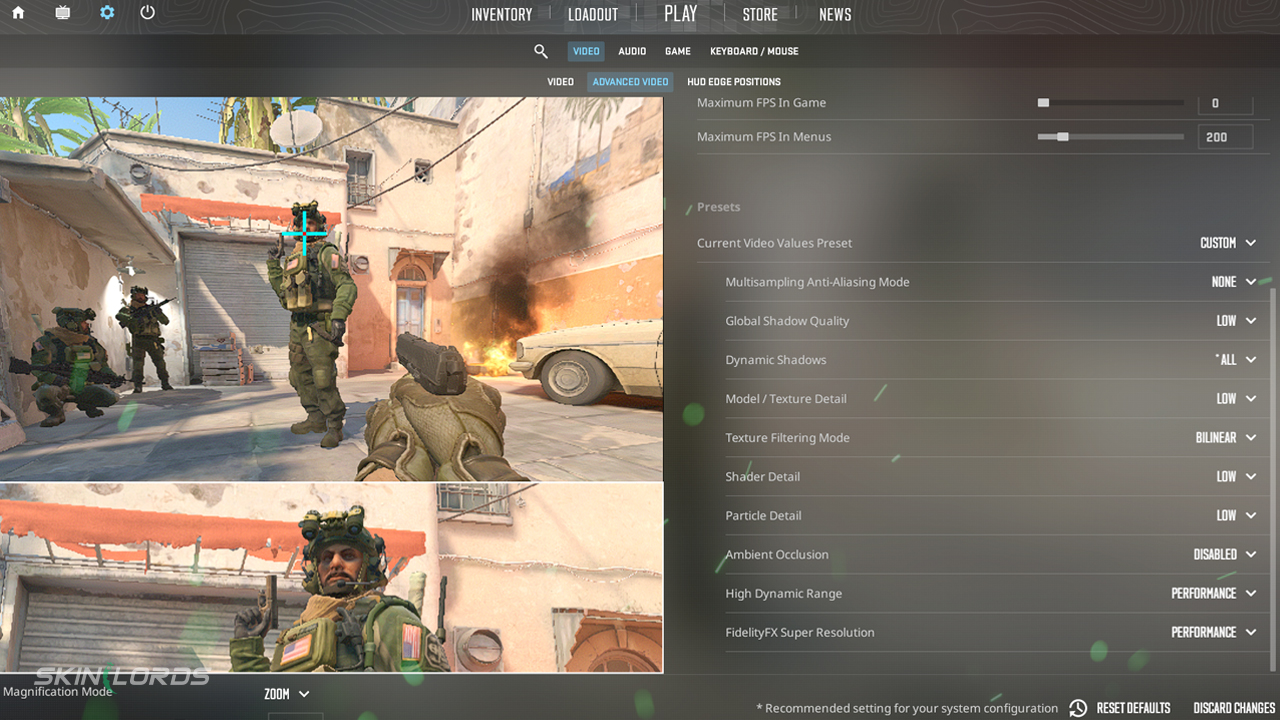
Once again, to explore what each of these graphics settings does (and explore options based on your situation), head over to our article on optimizing your settings for FPS maximization.
- Boost Player Contrast: Enabled
- Wait for Vertical Sync: Disabled
- Current Video Values Preset: Custom
- Multisampling Anti-Aliasing Mode: None
- Global Shadow Quality: Low
- Model/Texture Detail: Low
- Texture Filtering Mode: Billinear
- Shader Detail: Low
- Particle Detail: Low
- Ambient Occlusion: Disabled
- High Dynamic Range: Performance
- FidelityFX Super Resolution: Enabled
- NVIDIA Reflex Low Latency: Enabled
Wrapping Up!
In this article, we’ve covered how to monitor and control FPS in CS2 and the best CS2 settings for FPS. To learn more in-depth about other topics or skills in Counter-Strike 2, feel free to explore the other articles posted on the SkinLords Blog. As always, keep learning and have fun out there!
Similar Articles
See all
Guides

CS2 Marketplace GamerPay is Shutting Down
05.01.2026
0
191
Guides

Best CS2 Knives for the Driver Gloves Garden
04.24.2026
0
549
Leave a reply